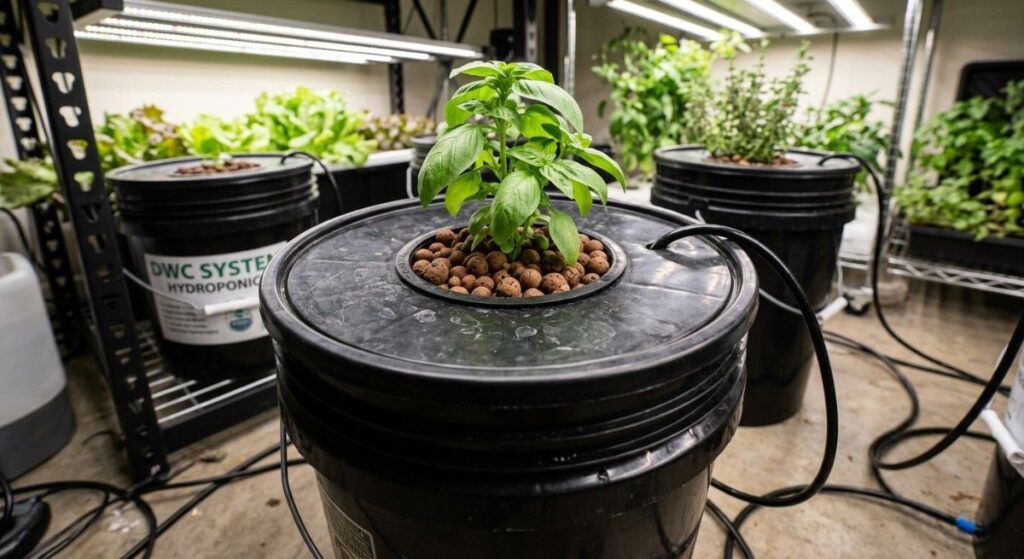
If you’ve ever lost a hydroponic crop to algae, root rot, or a simple evaporation problem, there’s a good chance the real culprit was something you overlooked: the lid on your bucket. It sounds almost too simple to matter — a piece of plastic sitting on top of a container — yet the hydroponic bucket lid is arguably the single most functional component in a Deep Water Culture (DWC) or Kratky system. It governs oxygen levels, controls light penetration, supports your plant’s physical weight, and determines how well your entire nutrient reservoir performs.
In this comprehensive guide, we’ll cover everything you need to know about hydroponic bucket lids — from understanding the different types and materials available, to selecting the perfect lid for your specific grow setup, to step-by-step DIY instructions for building your own. Whether you’re a curious beginner setting up a single-bucket herb garden or an experienced grower running a 20-bucket ebb-and-flow operation, this article will give you the knowledge to make every lid decision count.
Why Hydroponic Bucket Lids Are More Important Than You Think
In soil-based gardening, the growing medium itself acts as a buffer — it regulates moisture retention, insulates roots, and filters pathogens. In hydroponics, that buffer doesn’t exist. Your plant’s roots are suspended directly in a nutrient solution, making every component of the system critically important. The bucket lid is the primary interface between the outside environment and that delicate root zone.
The Three Core Functions of a Bucket Lid
A well-designed hydroponic bucket lid performs three essential jobs simultaneously, and doing any one of them poorly creates cascading problems throughout your grow.
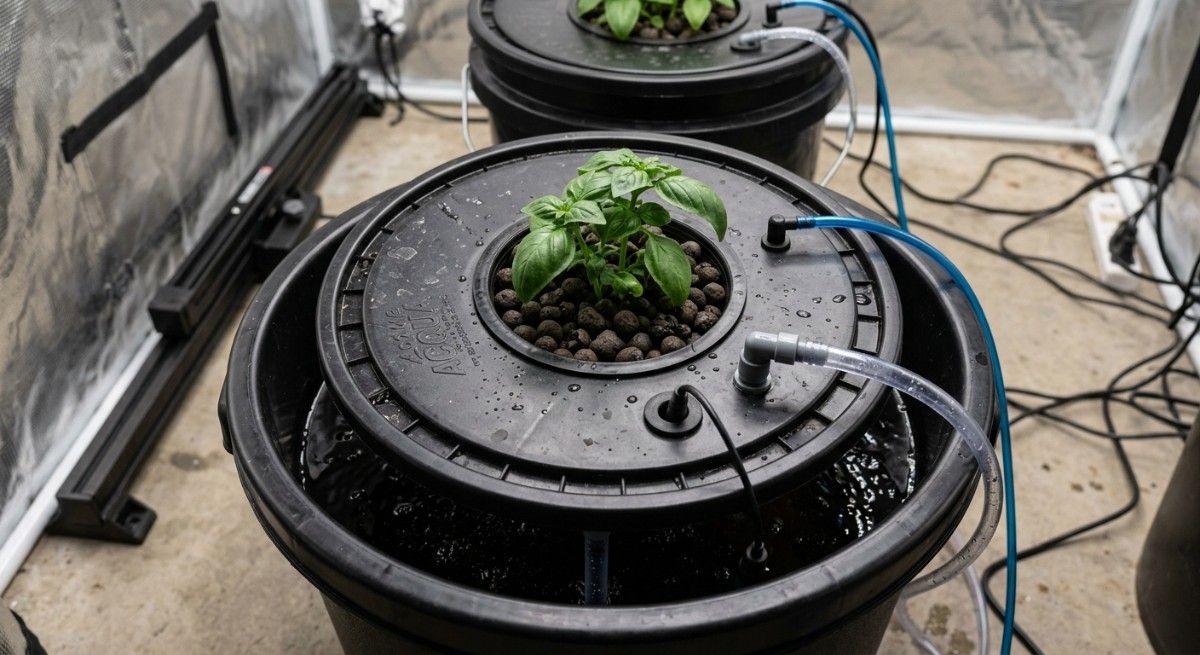
Environmental Separation: The lid seals the nutrient reservoir from the outside world, preventing airborne pathogens, dust, insects, and contaminants from entering the solution. It also keeps light out — an absolute necessity, since light penetrating the reservoir triggers rapid algae growth that competes with plants for nutrients and oxygen.
Structural Plant Support: Most hydroponic bucket lids include one or more openings for net cups, which hold the growing medium and the plant itself. The lid must bear the full weight of a mature plant, which can reach several kilograms for crops like tomatoes, peppers, or cannabis. A flimsy lid that bows or cracks can lead to plant collapse and water contamination.
Oxygen and Airflow Management: Roots need oxygen just as much as they need water and nutrients. The lid design influences how well air pumps and air stones circulate dissolved oxygen through the solution. In Kratky systems, the lid also helps maintain the critical air gap between the water surface and the underside of the net cup.
Pro Insight: Research consistently shows that dissolved oxygen levels below 5 mg/L significantly stress plant roots. A properly fitted, light-blocking lid paired with an air stone can keep oxygen levels well above that threshold, dramatically reducing root rot and improving nutrient uptake.
Why Growers Often Underestimate the Lid
New hydroponic growers typically spend a lot of energy thinking about nutrients, lighting, and pH — and rightly so. But because bucket lids don’t actively “do” anything visible, they get overlooked. The consequences are slow and insidious: algae that builds up gradually, evaporation losses that throw off nutrient concentration, or pH instability caused by temperature swings in an unsealed reservoir. Understanding the lid’s role transforms it from an afterthought into a strategic component of your design.
Types of Hydroponic Bucket Lids Explained
Walk into any hydroponics supply store — or browse online — and you’ll quickly realize that “bucket lid” covers a surprisingly wide range of products. Here’s how to understand the landscape.
Standard Snap-On Lids
These are the most basic option: a flat disc of HDPE (high-density polyethylene) or polypropylene that snaps onto a standard 5-gallon bucket. They are widely available, food-grade, and inexpensive. The limitation is that they don’t come pre-drilled — you’ll need to cut your own net cup holes. For beginners doing a single-plant Kratky grow, a snap-on lid with a hole saw is perfectly sufficient.
Pre-Drilled Hydroponic Lids
These lids arrive ready for use, with one or more holes already sized to fit standard net cups (typically 2-inch, 3-inch, or 6-inch diameters). Pre-drilled DWC lids are the most popular product in dedicated hydroponics retailers and eliminate the most common point of failure for beginners — uneven or incorrectly sized holes. Multi-hole lids (often with 4 or 6 openings) allow for higher plant density in a single reservoir.
Image suggestion: A side-by-side photo of a blank snap-on lid and a pre-drilled hydroponic lid with four 2-inch net cup holes. Alt text: Two 5-gallon bucket lids — a blank snap-on lid on the left and a pre-drilled hydroponic lid with four 2-inch net cup holes on the right, photographed on a white background.
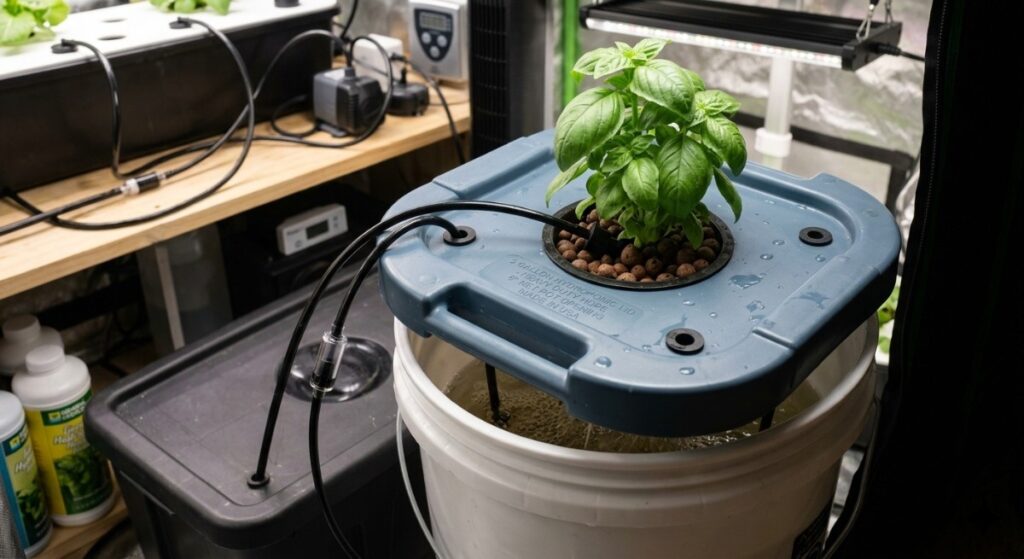
Custom-Fit and System-Specific Lids
Larger hydroponic setups often use branded lids designed to fit proprietary systems like the General Hydroponics WaterFarm, the Alien Hydroponics RDWC, or the HydroFarm Global Buckets. These lids integrate features like built-in fill ports, overflow tubes, recirculation connectors, and specialized net cup sockets. If you’re running a Recirculating Deep Water Culture (RDWC) system, system-specific lids aren’t just convenient — they’re often structurally necessary.
Foam/Neoprene Inserts and Mesh Lids
Some setups use rigid mesh or screen lids rather than solid covers, relying on opaque covers placed above them. Others use foam collars or neoprene inserts as a hybrid — the insert cradles the plant stem while a solid lid beneath blocks light. Neoprene net cup inserts are especially popular in Nutrient Film Technique (NFT) and aeroponic systems where standard net cups aren’t used.
Material Comparison at a Glance
| Material | Light Block | Durability | Food-Safe | Best For |
|---|---|---|---|---|
| HDPE (Black) | Excellent | 5–10 yrs | Yes | Most DWC/Kratky grows |
| Polypropylene | Good | 3–7 yrs | Yes | Smaller indoor setups |
| White/Opaque PP | Poor alone | 3–5 yrs | Yes | Needs foil/paint coating |
| Resin/Fiberglass | Excellent | 10+ yrs | Depends on grade | Commercial operations |
| Neoprene Insert | N/A (insert) | 2–4 yrs | Yes | NFT, aeroponic, cloner |
How to Choose the Right Lid for Your System
Selecting the correct hydroponic bucket lid isn’t a one-size-fits-all decision. It depends on the type of system you’re running, the plants you’re growing, and the scale of your operation. Here’s how to think through it systematically.
Match Lid Size to Bucket Size
This seems obvious, but it’s the most common sourcing mistake. Standard 5-gallon buckets in the US take lids with an outer diameter of approximately 11.9 inches. However, bucket manufacturers vary slightly, and not all “5-gallon lids” are interchangeable. Always verify the interior lip diameter of your bucket and the outer rim diameter of the lid before purchasing in bulk. For 2-gallon and 3.5-gallon systems (popular for smaller plants like lettuce and herbs), different sizing standards apply entirely.
Consider Plant Weight and Root Mass
A mature tomato plant in DWC can weigh 5–8 lbs or more, and its root mass may fill the entire bucket. The lid bears this weight through the net cup socket. For heavy-fruiting crops, look for lids with reinforced net cup flanges or a thicker overall gauge (minimum 3mm HDPE for large plants). Thin lids crack at the net cup hole under the plant’s weight, especially with vigorous root growth pushing upward.
Number of Plants per Bucket
For single-plant DWC, a single-hole lid centered on the bucket is optimal — it gives the plant maximum room and keeps the root mass balanced. For sea-of-green (SOG) grows or multi-plant Kratky setups, multi-hole lids allow you to pack more plants into a single reservoir, reducing equipment costs. However, more plants per bucket increases competition for dissolved oxygen and nutrients, requiring a proportionally stronger air pump setup.
Important: Using multiple plants in a single DWC bucket without increasing your air pump capacity is one of the fastest ways to create root rot conditions. For every additional plant in a 5-gallon bucket, upgrade to at least a 4 LPM (liters per minute) air pump rating.
Indoor vs. Outdoor Growing Environments
Outdoor hydroponic setups face UV exposure, temperature swings, wind, and direct sunlight. Black HDPE lids are ideal outdoors because their color absorbs rather than reflects UV, slowing material degradation. Never use clear or translucent lids outdoors — even indirect sunlight will cause rapid algae colonization of your reservoir. For indoor grows under artificial lighting, any opaque lid works, but black is still preferred because stray light from grow lamps can sneak around lid edges.
Net Cups and Hydroponic Bucket Lids: The Perfect Pair
Net cups — also called net pots or mesh pots — sit inside the holes drilled into your bucket lid, cradling the growing medium and the plant. The relationship between your lid hole size and your net cup diameter is one of the most important fitment decisions in your entire system.
Understanding Net Cup Sizing
Net cups are sized by their outer diameter at the widest point (the rim), not by depth or volume. The most common sizes in hydroponic bucket systems are:
- 2-inch cups — ideal for seedlings, herbs (basil, cilantro, mint), microgreens, and lettuce starters
- 3-inch cups — the workhorse size for most vegetable transplants, strawberries, and medium herbs
- 4-inch cups — popular for peppers, small tomato varieties, cucumbers in early stage
- 6-inch cups — used for large-fruiting plants (tomatoes, squash), cannabis, and mature root vegetables
- 8-inch cups — commercial and large-scale DWC for dwarf fruit trees or very large specimens
How to Drill a Net Cup Hole Perfectly
The hole in your bucket lid should be very slightly smaller than the outer rim of the net cup — typically 1/8 inch smaller in diameter — so the cup sits snugly without falling through. The cup’s flanged rim rests on the lid surface, providing support. A hole that’s too large lets the cup fall into the reservoir; a hole too small forces the cup and may crack the lid.
Use a hole saw drill bit matched to your cup size. For a 3-inch net cup, use a 3-inch hole saw, which cuts a hole slightly under 3 inches that a standard lipped net cup will snap into perfectly. Mark the center of your lid carefully before drilling — off-center holes create uneven weight distribution and root zone problems as the plant matures.
The net cup isn’t just a planting vessel — it’s the physical interface between the plant and the entire hydroponic system. Getting this fitment right means the difference between a plant that thrives for months and one that tips, rocks, or falls into the reservoir at the worst possible moment.
Growing Media Choices for Net Cups in Bucket Systems
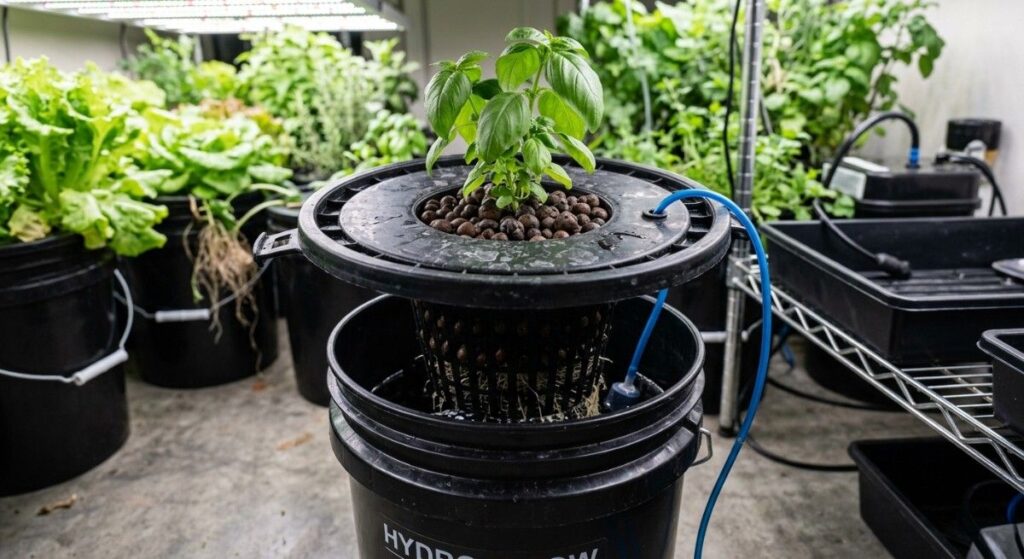
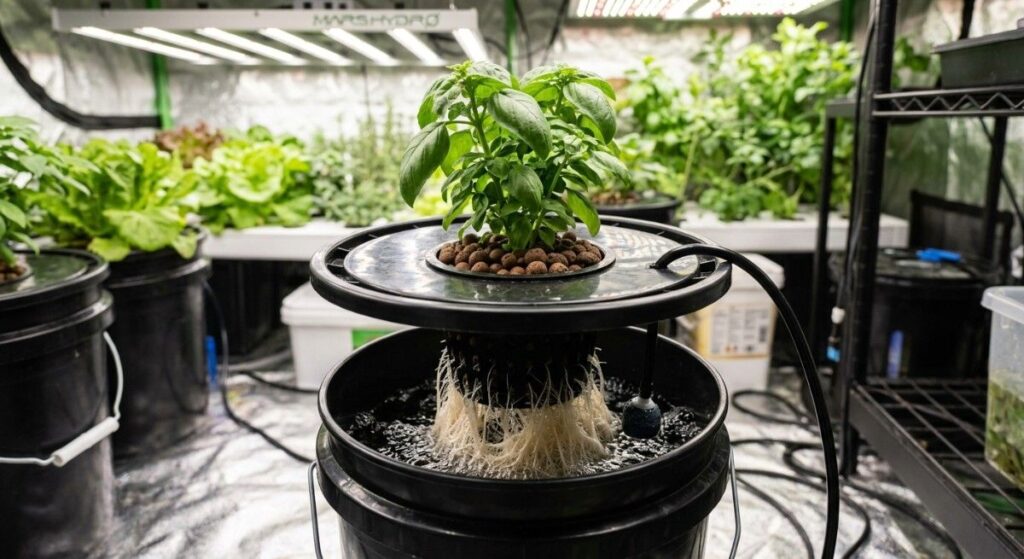
Once your net cup is seated in the lid, it needs to be filled with a growing medium. In DWC systems, the medium’s job is only to anchor the plant — it doesn’t provide nutrients. The best options are hydroton (clay pebbles), rockwool cubes, perlite, or coco coir. Clay pebbles are by far the most popular because they are reusable, pH-neutral, inert, and allow excellent air circulation around the upper root zone.
DIY Hydroponic Bucket Lids: Build Your Own Setup
Building your own hydroponic bucket lids from scratch is not only cost-effective but gives you complete control over hole placement, number of plants, and system integration. Here’s a step-by-step guide to creating a functional, durable DIY DWC lid from a standard 5-gallon bucket lid.
What You’ll Need
- Standard 5-gallon HDPE bucket lid (black, food-grade)
- Hole saw drill bit set (2″, 3″, or 6″ depending on your net cup size)
- Cordless drill with variable speed setting
- Ruler, compass, or lid-marking template
- Permanent marker (silver or white for visibility on black)
- Sandpaper (120-grit) for edge smoothing
- Optional: grommet set for air tubing ports, food-grade silicone sealant
Step-by-Step: Building a Single-Plant DWC Lid
Step 1 — Mark the Center Point Lay your lid flat on a stable surface. Use a ruler to find the exact center of the lid by drawing two diagonal lines from opposite sides. Where they intersect is your center. Mark it clearly with a white or silver marker.
Step 2 — Attach the Hole Saw Bit Secure the appropriately sized hole saw bit to your drill. For most single-plant DWC setups, a 3-inch hole saw for 3-inch net cups is the go-to choice. Make sure the center pilot bit is set and tight — this guides the cut and prevents the saw from skating across the lid.
Step 3 — Drill at Low Speed Place the pilot bit on your center mark, hold the lid firm (clamp it to a workbench if possible), and drill at the slowest speed your drill allows. HDPE melts rather than cuts at high speed — slow drilling produces a clean edge. Apply steady, even pressure downward without forcing the bit.
Step 4 — Smooth the Edges Remove the cut disc and inspect the hole edge. Use 120-grit sandpaper to smooth any burrs or rough spots around the circumference. This prevents tearing of net cup rims and ensures a snug, consistent fit.
Step 5 — Add Air Tubing Ports (Optional) If your air pump line needs to enter through the lid rather than under it, drill a small secondary hole (sized to your air tubing diameter — typically 5/16″) near the lid edge. Insert a rubber grommet to prevent the tubing from fraying or creating a light gap. Seal around the grommet with food-grade silicone if needed.
Step 6 — Test Fit and Light-Check Snap the lid onto your bucket, drop in your net cup, and move the assembly into a dark room. Shine a flashlight into the bucket from below and look around the lid edges and net cup hole for any light bleed. Seal gaps with light-blocking foam tape or black silicone before planting.
DIY Tip: For a multi-plant lid, position net cup holes so that the outer edge of each hole is at least 2 inches from the bucket wall and at least 3 inches from any neighboring hole. This prevents root competition in the early stages and gives plants room to spread as they mature.
Light Blocking, Algae Control & Other Lid Best Practices
Even a perfectly drilled, correctly sized lid can fail you if light sneaks through gaps. Algae control in the nutrient reservoir is an ongoing battle in any hydroponic system, and the lid is your first and most important line of defense.
Why Algae Is So Dangerous in DWC Systems
Algae thrive on light, water, and dissolved nutrients — the exact combination present in every hydroponic bucket. A green algae bloom in your reservoir doesn’t just look unpleasant; it actively deprives plant roots of dissolved oxygen as it respires, competes directly for nutrients (especially nitrogen and phosphorus), causes pH swings, and creates a breeding ground for root pathogens like Pythium and Fusarium. A heavy bloom can crash an entire system within 48–72 hours of onset.
Achieving True Light Exclusion
True light exclusion means zero photons reaching the water surface. Here’s how to achieve it in practice:
- Use only black HDPE lids — never white, grey, or translucent materials
- Seal the rim joint between lid and bucket with black foam weatherstrip tape
- Wrap the net cup-to-lid gap with a collar of black silicone or self-adhesive foam
- Wrap exposed bucket sides (if translucent) with black panda film or reflective Mylar
- Avoid drilling unnecessarily large air tube ports — keep these as small as possible
- Inspect your entire reservoir for light bleed at least once per crop cycle
Temperature Management Through Your Lid Design
Nutrient solution temperature directly impacts both plant health and dissolved oxygen capacity — warmer water holds less oxygen. Your bucket lid plays a role here too. A black lid placed outdoors in direct sunlight absorbs heat and conducts it into the reservoir. In summer or warm climates, consider placing a reflective layer (aluminum foil tape or Mylar sheet) on the top surface of your lid to reflect radiant heat. Ideally, keep reservoir temperatures between 65°F and 72°F (18°C–22°C) for optimal dissolved oxygen and root health.
Lid Maintenance and Cleaning Between Cycles
After each crop cycle, remove the lid, scrub it with a 1:10 bleach-to-water solution, rinse thoroughly with clean water, and allow it to air dry before the next use. Check for hairline cracks around net cup holes (common after 2–3 years of use), and replace any lid that shows structural weakness. Reusing contaminated or cracked lids is one of the leading causes of Pythium carryover between grow cycles.
Common Mistakes Growers Make with Bucket Lids
Even experienced hydroponic growers make recurring mistakes with their bucket lids. Awareness of these pitfalls will save you crops, money, and frustration.
Using the Wrong Bucket-to-Lid Pairing
Bucket and lid manufacturers don’t share a universal standard. A lid from Brand A may fit tightly on their own bucket but leave a 1/4-inch gap on a competitor’s bucket of the “same” size. Always purchase lids and buckets together from the same manufacturer, or physically test the fit before committing to bulk purchases. A loose-fitting lid is a light leak waiting to happen.
Drilling Net Cup Holes Too Large
When cutting net cup holes with a hole saw, there’s a temptation to go slightly bigger to make the cup easier to insert. Don’t. An oversized hole means the net cup can shift, tip, or fall through, especially as plant weight increases. The hole should create a snug friction fit, with the cup’s outer rim resting on the lid surface as a flange — not passing through it.
Ignoring the Air Gap in Kratky Systems
In passive Kratky hydroponics (no air pump), the lid plays a uniquely critical role in maintaining the oxygen-providing air gap between the water surface and the bottom of the net cup. As the plant drinks and the water level drops, this air gap grows — and the plant develops specialized aerial roots in this zone. A lid that sits too low can flood this gap and suffocate roots. Always monitor and adjust (or pre-plan) your initial water fill level relative to your lid height.
Common Mistake: In Kratky systems, filling the reservoir so that nutrient solution touches the bottom of the net cup is appropriate for germination only. Once the seedling is established (typically 1–2 weeks after germination), the water level should drop naturally — never refill to the original level, as this drowns the aerial root zone.
Not Sealing Around the Net Cup
Even when the net cup fits snugly in the lid hole, light can still enter through the gap between the cup’s mesh sides and the hole edge. This thin crescent of light is enough to trigger algae growth inside the reservoir. A simple solution: cut a collar from black foam pipe insulation and press it around the cup-to-lid joint, or use a small bead of black aquarium-safe silicone to seal the gap permanently.
Top Features to Look for When Buying Hydroponic Bucket Lids
When shopping for hydroponic bucket lids — whether as a first-time buyer or replacing worn components in an established system — these are the features that separate genuinely useful products from those that look adequate on paper but fail in the garden.
Opaque Black HDPE Construction
This is non-negotiable for any serious grow. Virgin black HDPE plastic is inherently UV-stabilized, food-safe, chemically inert in the presence of hydroponic nutrients, and fully opaque to both visible light and UV wavelengths. Avoid recycled-content black plastic unless its composition is clearly certified — recycled plastics sometimes contain contaminants that can leach into nutrient solutions at elevated temperatures.
Thick Gauge Material (3mm or More)
Lid thickness determines structural durability. For single-plant grows, 2mm may suffice. For large fruiting plants or multi-hole configurations carrying several mature plants, 3–4mm is necessary to prevent lid flex and cracking. Some premium hydroponic lids are injection-molded with reinforcing ribs on the underside for added rigidity without additional weight — these are worth the extra cost in large operations.
Pre-Drilled vs. DIY Flexibility
Pre-drilled lids with factory-cut net cup holes are cleaner and more consistent than most DIY holes, and the time savings across a large system add up quickly. However, if your setup uses non-standard bucket sizes or unconventional plant spacing, the ability to drill custom holes gives you exact control. Consider keeping both options available — pre-drilled for standard crops, blank lids for experimental or specialty configurations.
Integrated Grommets and Port Access
High-quality DWC and RDWC lids often include molded rubber grommets for air tubing and/or recirculation plumbing. These grommets create a watertight, light-proof seal around any penetrating tube or fitting. If you’re planning to run RDWC or add supplemental oxygenation via air stones, lids with pre-installed grommets in thoughtful positions (edge of lid rather than center) make the installation process significantly cleaner and more reliable.
Compatibility with Standard Systems
If you’re using equipment from a specific manufacturer — General Hydroponics, AutoPot, HydroFarm, or similar — check whether their lids are designed to integrate with their other components (fill valves, water level indicators, overflow ports). Brand-matched lids often use proprietary thread sizes and fitting tolerances that make the overall system more reliable than mixing components from different manufacturers.
Buying Tip: When buying lids in bulk for a large grow room, order 10–15% more than you need. Lids crack, warp, or get damaged during installation. Having spares on hand prevents the frustration of a single broken lid shutting down an entire bucket station mid-cycle.
Conclusion: Get the Lid Right and the Rest Gets Easier
The hydroponic bucket lid may be the humblest component in your entire grow system, but it is far from a minor one. It is the boundary between a stable, productive root zone and a chaotic environment of light intrusion, temperature swings, evaporation loss, and algae proliferation. Get it right, and everything downstream — nutrient uptake, dissolved oxygen, root health, plant structure — becomes more manageable. Get it wrong, and even the best nutrients and lighting in the world won’t save your crop.
To summarize the key takeaways from this guide: always use food-grade, black HDPE lids for full light exclusion; match your hole size precisely to your net cup diameter for a snug, stable fitment; seal every potential light gap around the lid rim and net cup joint; manage your air gap carefully in Kratky passive systems; and clean and inspect your lids between every crop cycle. If you’re building DIY setups, take your time with the drilling process — a clean, correctly sized hole is foundational to everything else.
Whether you’re growing herbs on a windowsill or running a commercial lettuce operation, the principles are the same. Invest a little more thought into your hydroponic bucket lids, and you’ll spend a lot less time troubleshooting problems that never needed to happen.
If this guide helped you, share it with a fellow grower, leave a comment with your own setup tips, or bookmark it for your next build. Your bucket lids are waiting to be optimized.