You walk into your grow room. Your best lettuce is wilted. The water tank is completely empty. This happened because you forgot to flip a switch. You walk into your grow room. Your best lettuce is wilted. The water tank is completely empty. This happened because you forgot to flip a switch! It is the nightmare of every indoor gardener. In the world of hydroponics, precision isn’t just a luxury—it’s the difference between a record-breaking harvest and a total system collapse.
The “heartbeat” of any successful indoor garden is the hydroponic timer. It dictates when your plants eat, breathe, and rest. Without it, you are tethered to your grow room, a slave to the watering schedule. With the right one, you gain freedom and, more importantly, your plants gain the consistency they crave.
In this comprehensive guide, we will dive deep into the world of hydroponic automation, helping you navigate the technical jargon to find the perfect timing solution for your specific setup.
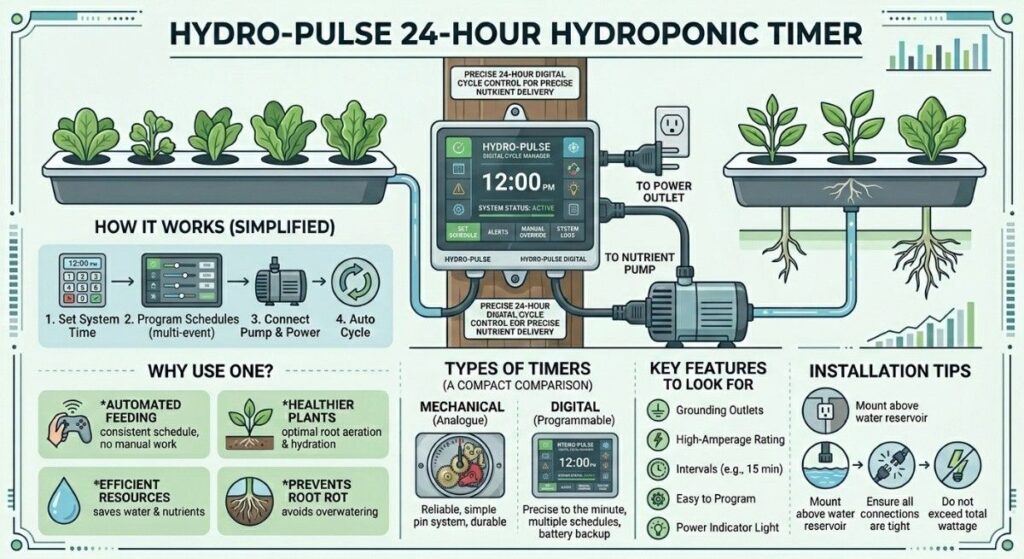
What Exactly is a Hydroponic Timer?
At its simplest, a hydroponic timer is a device that sits between your power outlet and your water pump (or lights). It acts as an automated gatekeeper, turning the flow of electricity on and off at pre-set intervals.
In a soil-based garden, the earth acts as a buffer, holding moisture for days. In hydroponics, particularly in systems like Aeroponics or NFT (Nutrient Film Technique), the roots have very little protection. If the pump stops, the roots dry out in minutes. The timer ensures that the “flood and drain” or “mist” cycle happens exactly when it should, 24 hours a day.
The Evolution of Timing Technology
Early hydroponic setups relied on mechanical “pin” timers—the kind you might use for your Christmas lights. While effective, they lacked the precision needed for advanced growing. Today, we have access to digital micro-circuitry and Wi-Fi-connected “Smart” plugs that can be controlled from a smartphone halfway across the world.
Why Automation is Non-Negotiable for High Yields
If you are serious about your garden, you cannot rely on manual operation. Here is why a hydroponic timer is your most valuable employee:
Consistency is King
Plants thrive on routine. Fluctuations in moisture levels cause stress, which stunts growth and invites pests. A timer provides a rhythmic environment where the plant can focus all its energy on photosynthesis and fruit production rather than surviving “drought” periods.
Oxygenation of the Root Zone
One of the biggest mistakes new growers make is overwatering. In an Ebb and Flow system, the “drain” cycle is just as important as the “flood” cycle. When the water recedes, it pulls fresh oxygen into the root zone. A hydroponic timer allows you to dial in these intervals to the second, ensuring your roots never “drown.”
Efficiency and Resource Management
Automation prevents waste. By timing your pumps to run only when necessary, you save on electricity and prolong the life of your expensive water pumps.
Types of Hydroponic Timers: Finding Your Match
Not all timers are created equal. Depending on your system—whether it’s a simple DWC (Deep Water Culture) or a complex high-pressure aeroponics rig—you will need a specific type of controller.
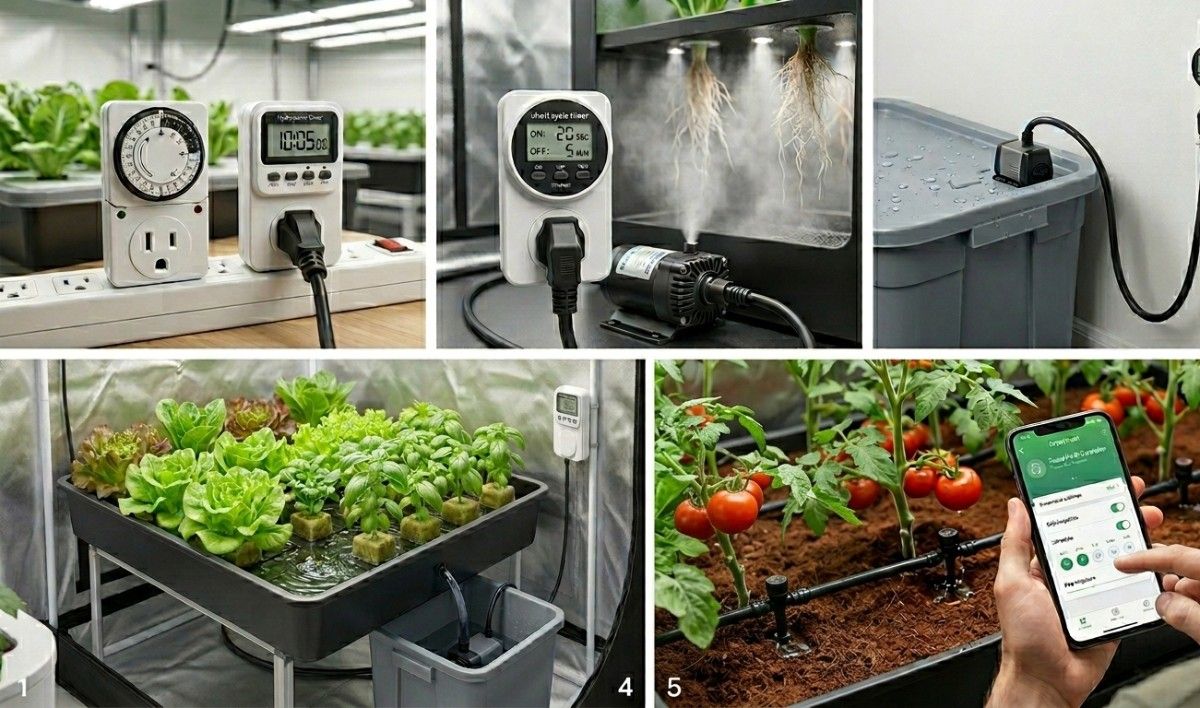
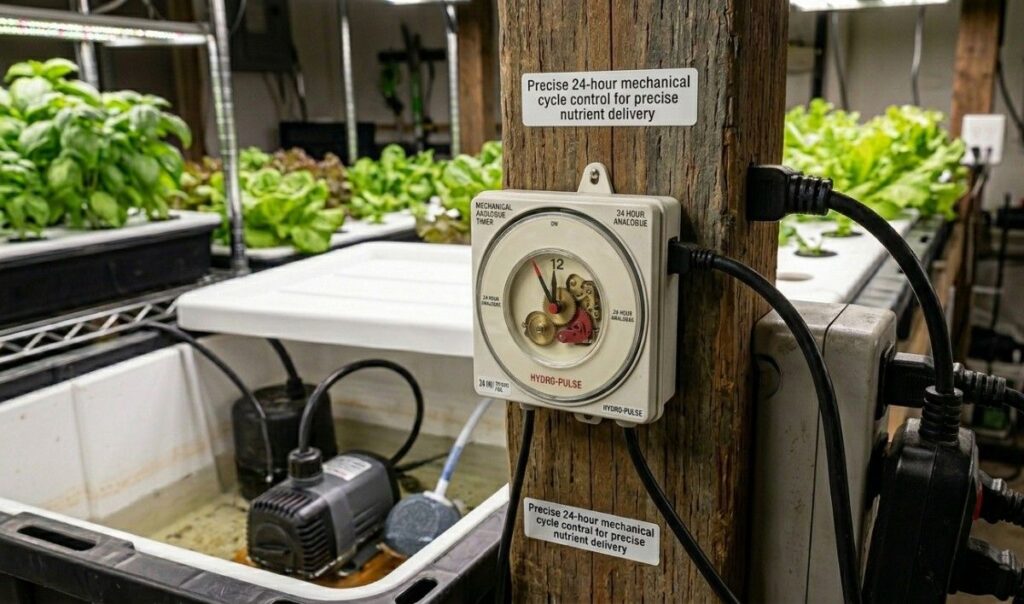
Analog (Mechanical) Timers
These are the old-school workhorses of the industry. They feature a dial with “pins” that you push down or pull up to set your “on” and “off” times.
Pros: Extremely reliable, easy to understand, and cheap.
Cons: Usually limited to 15-minute intervals. They are not suitable for systems that need short bursts of water.
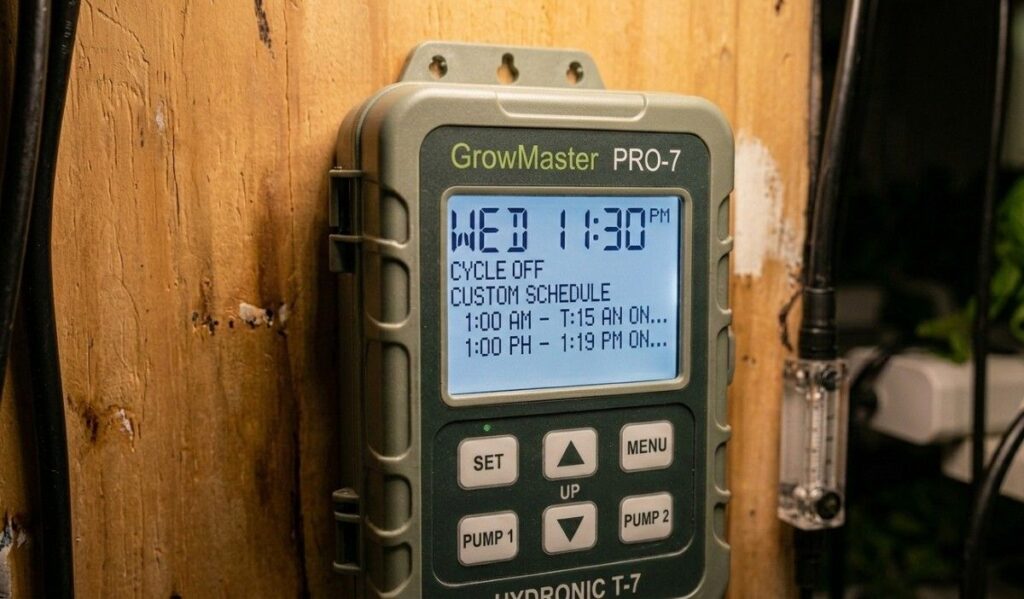
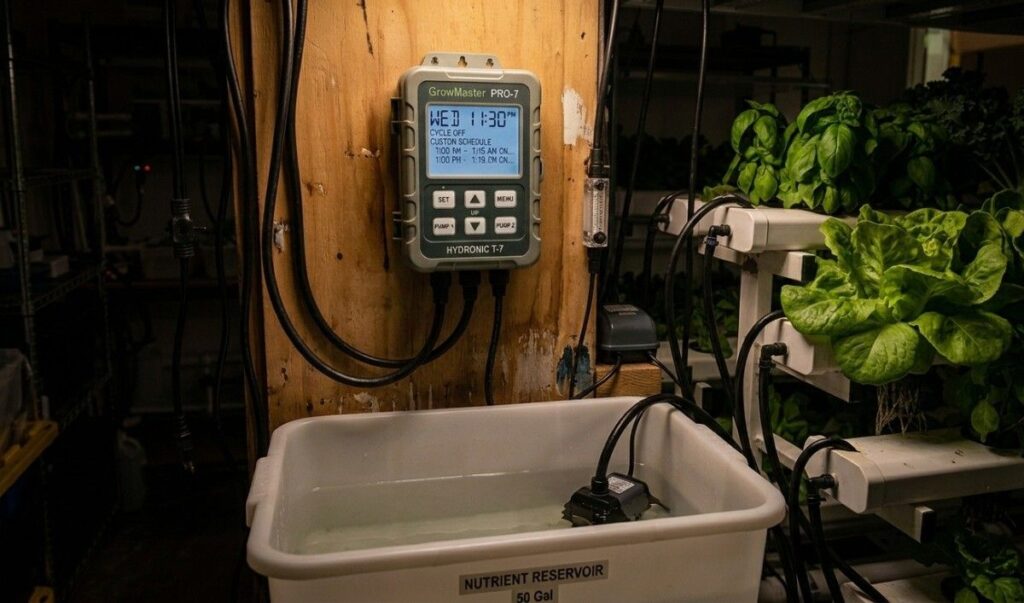
Digital Timers
Digital models offer much higher precision. You can often set these down to the minute.
Pros: Ability to set different schedules for different days; usually include a battery backup so they don’t lose their memory during a power outage.
Cons: Can be slightly more complex to program.
Short Cycle Timers (Repeat Cycle)
This is the “specialist” of the hydroponic timer world. These are designed specifically for aeroponics or fogger systems where you might need the pump to run for 20 seconds every 3 minutes.
Recommendation: If you are running an aeroponic setup, a standard digital timer won’t work. You must invest in a dedicated short-cycle timer.
Smart Wi-Fi Controllers
The modern standard. These plug into your home network and allow you to monitor and change settings via an app.
Pros: Remote monitoring, integration with sensors (like humidity or temperature), and data logging.
Cons: Requires a stable internet connection. If your Wi-Fi drops, some cheaper models may fail to trigger.
System-Specific Timing Strategies
Your timer settings are not “one size fits all.” Different hydroponic methods require vastly different approaches.
Ebb and Flow (Flood and Drain)
In these systems, you typically flood the tray 3 to 6 times a day during the “lights on” period.
Timer Tip: Use a standard digital timer. Set it to flood for 15 minutes and then drain.
Nutrient Film Technique (NFT)
NFT systems usually require the pump to run 24/7. However, some growers use a hydroponic timer as a safety measure or to pulse the flow during the “lights off” period to prevent root rot.
Aeroponics
This is the most demanding system. Roots are suspended in the air and misted.
The Schedule: Often 1 minute on / 5 minutes off. This requires a short cycle timer with “repeat” functionality.
Drip Irrigation
Drip systems are often used with rockwool or coco coir. Since these media hold some water, you might only need to trigger your timer 2-4 times a day for short durations.
Critical Features to Look For
When shopping for a hydroponic timer, don’t just grab the cheapest one at the hardware store. Look for these “grow-specific” features:
Grounded Outlets: Always use 3-prong grounded timers. Water and electricity are a dangerous mix; grounding is a non-negotiable safety feature.
Amperage Rating: Water pumps and high-intensity discharge (HID) lights draw a lot of “startup” current. Ensure your timer is rated for at least 15 Amps.
Battery Backup: If the power goes out for an hour, you don’t want your timer to “forget” what time it is and start your watering cycle in the middle of the night.
Manual Overide: Sometimes you just need to turn the pump on to mix nutrients or check for leaks. A physical “On/Off/Auto” switch is a lifesaver.
Installation and Safety: Protecting Your Garden
Setting up your hydroponic timer involves more than just plugging it in. To ensure a long life for your electronics and your plants, follow these best practices:
Use a “Drip Loop”
Never allow a cord to run straight from the reservoir to the timer. If water splashes or leaks, it can run down the cord directly into the outlet. Create a “U” shape in the cord (a drip loop) so that any water falls off the bottom of the curve rather than entering the electronics.
Avoid “Daisy Chaining”
Do not plug a power strip into a timer, and then plug five different pumps into that strip. This is a fire hazard. If you have multiple devices to time, buy a multi-outlet hydroponic controller designed for the load.
Keep it High and Dry
Mount your timers on the wall at eye level. This keeps them away from accidental spills on the floor and makes them easier to read and program.
Common Mistakes and How to Avoid Them
Even with the best hydroponic timer, user error can lead to disaster.
The “Set and Forget” Fallacy: Check your timer once a week. Mechanical pins can get bumped, and digital screens can fail.
Ignoring the Seasonal Shift: As your plants grow larger and the room gets warmer, they will transpire more water. You may need to increase the frequency of your watering cycles in mid-summer.
Wrong Timer for the Task: Don’t try to use a 15-minute analog timer for an aeroponic system. You will either drown the roots or dry them out.
Future Trends: Sensor-Driven Timing
The next frontier of the hydroponic timer is “closed-loop” automation. Instead of a fixed schedule, these systems use moisture sensors in the root zone. When the sensor detects the medium is 20% dry, it triggers the timer to run the pump. This “on-demand” watering mimics nature even more closely and can significantly boost growth rates.
If you’re a tech-savvy grower, look into platforms like Home Assistant or Arduino-based controllers to build your own custom timing logic.
Summary and Final Thoughts
A hydroponic timer is perhaps the most cost-effective investment you can make in your indoor garden. For less than $30, you can move from a manual, high-stress hobby to an automated, high-yield professional setup.
Key Takeaways:
Analog is great for simple setups; Digital is better for precision; Short Cycle is mandatory for aeroponics.
Always match your timing schedule to your specific hydroponic method.
Prioritize safety features like grounding and battery backups.
Regularly monitor your hardware to ensure your “heartbeat” is still pulsing.
Investing time now to set up your automation correctly will pay dividends in the form of lush, healthy plants and a much more relaxing gardening experience.
What’s your preferred watering schedule? Do you swear by old-school analog or are you a smart-home enthusiast? Let us know in the comments below!
FAQ
1. How do I set a mechanical timer for my hydroponic pump?
Setting a mechanical timer is actually pretty fun once you get the hang of it! Most of these timers have a ring of small plastic “pins” around the edge. Each pin usually represents 15 minutes. To set your watering time, just push the pins down for the times you want the pump to run and leave them up for when it should be off. Don’t forget to turn the dial so the little arrow points to the current time, and make sure the side switch is set to “Timer” mode instead of “On.”
2. Should I use a digital or analog timer for my indoor garden?
It really depends on how much “tech” you want! Analog (mechanical) timers are great because they are super cheap and very reliable, but they usually only let you set 15-minute chunks. Digital timers are a bit more precise and let you set things down to the minute. If you just need to flood a tray a few times a day, analog is perfect. If you need a very specific schedule that changes on weekends, go with digital!
3. What is the best hydroponic timer for an aeroponic system?
For aeroponics, you need a special kind of timer called a short-cycle or repeat-cycle timer. Standard timers usually can’t turn on and off fast enough for misting roots. In aeroponics, your roots need a quick mist every few minutes (like 20 seconds on and 3 minutes off). Look for a timer that specifically mentions “short cycle” or “seconds” to make sure your plants stay hydrated and happy.
4. Will my hydroponic timer reset if the power goes out?
This is a great question! Mechanical timers will stop ticking when the power is out, so they will be “behind” by however long the power was off. You’ll need to turn the dial to the right time once the lights come back on. Most digital timers, however, have a small backup battery inside. This keeps their “memory” safe so they stay on schedule even if the power dips for a while.
5. How many watering cycles per day does an ebb and flow system need?
Most growers find that flooding their tray 3 to 6 times a day works best, but it depends on your plants and how warm your room is. A common rule of thumb is to flood the system once every few hours while your grow lights are on. Using a reliable hydroponic timer ensures your plants get that consistent “flood” they need to soak up nutrients without you having to be there to flip the switch.